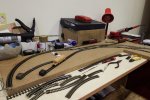
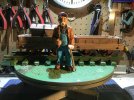
Love IKEA self build, goes together like a dream and numpties cant do it. Good earner if you were a DIY handyman that can.You're missing out on a lot of fun Chris, although the excitement is probably tempered by the lack of another new tool now
You are using an out of date browser. It may not display this or other websites correctly.
You should upgrade or use an alternative browser.
You should upgrade or use an alternative browser.
What happened at your workbench today?
- Thread starter Henri
- Start date
Fezwig
Just a man in the middle of a complicated plan.
As it's raining, I might arrange my collection of Ikea allen keys from over the yearsKeep up Chris!
No more tools... Ikea are moving to the wedge dowel.
No tools PhilP? how do you drive in the dowel if, say you were someone who was sadly hammerless
You don't..As it's raining, I might arrange my collection of Ikea allen keys from over the years
No tools PhilP? how do you drive in the dowel if, say you were someone who was sadly hammerless
Slip it in the slot, and slide.. Must admit to being dubious, but table legs that just slot in?
Rhinochugger
Retired Oik
Yep, on the one hand sounds dodgy, but their stuff is usually meticulously researchedYou don't..
Slip it in the slot, and slide.. Must admit to being dubious, but table legs that just slot in?
Why do so many people have it - 'cos you can't beat the quality at the price
Chris Vernell
45.29 N, 75.75 W
We need to be getting rid of furniture, not acquiring moreYou're missing out on a lot of fun Chris, although the excitement is probably tempered by the lack of another new tool now
Rhinochugger
Retired Oik
David1226
Registered
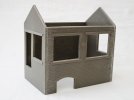
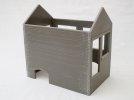
Having set aside the two buildings that I have started, to await paint, I have made a start on the third building that Father Christmas delivered for the Claptowte Railway, a Thorley Miniatures Signal Box. I have cleaned up the resin castings, washed them to remove any mould release agent, glued together the four walls and filled any gaps where the walls join. The next step will be to spray with grey primer. I have decided not to fit the roof until after I have painted the walls as it will then be easier to fit the door and window frames once they have also been painted.
David


David
Gizzy
A gentleman, a scholar, and a railway modeller....
Just done a pair of those meself David!Having set aside the two buildings that I have started, to await paint, I have made a start on the third building that Father Christmas delivered for the Claptowte Railway, a Thorley Miniatures Signal Box. I have cleaned up the resin castings, washed them to remove any mould release agent, glued together the four walls and filled any gaps where the walls join. The next step will be to spray with grey primer. I have decided not to fit the roof until after I have painted the walls as it will then be easier to fit the door and window frames once they have also been painted.
View attachment 279282
View attachment 279281
David
I should get the paints delivered tomorrow.
I've decided not to use the glazing, so I have glued some old signage I had from work inside, and I'm going to paint them a 'glass like' dark blue gloss colour.
I will use these signal boxes to hide the IP67 enclosures that will contain my point decoders, so I won't be modelling an interior as I imaging you will....
Fezwig
Just a man in the middle of a complicated plan.
More small F progress, firstly, tapered the running boards so that they are thinner on the outer edge and glued them on with a dip towards the centre to give that classic IOM coach sag.
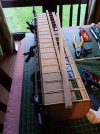
Then glued in the centre partition and seats (also end seats) to give the body strength, the end beading was also glued in place
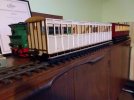
Need to plan the roof next and a few details, also waiting for some "sand sealer" so I can begin under coating.

Then glued in the centre partition and seats (also end seats) to give the body strength, the end beading was also glued in place

Need to plan the roof next and a few details, also waiting for some "sand sealer" so I can begin under coating.
David1226
Registered
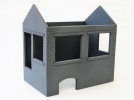
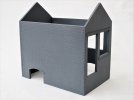
I have now sprayed the bare shell of the Thorley signal box and am currently cleaning up the castings of the rest of the component parts. I have an issue with the steps up to the signal box door. There are no exploded diagrams to show assembly and I am relying on the excellent set of photographs, accompanying the sales offer on eBay, that show various views of the finished model. The steps defy engineering logic with no visible means of support for the treads. I am going to have to rethink them and come up with a believable modification.
David


David
I did a couple of bits n bobs to 2 projects yesterday. Having recieved the ordered 2 pairs of Brandbright RSA46 Loop Buffer Couplings on Tuesday I decided to clean them all up and mount a pair to the Red Loco as it is now known. The pic shows the bogie that I used to set the height right.
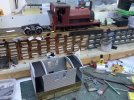
I also mounted the sides and ends of the Gauge 3 Steam Tram plus cut some roof profile.

I also mounted the sides and ends of the Gauge 3 Steam Tram plus cut some roof profile.
Gizzy
A gentleman, a scholar, and a railway modeller....
David, I just glued the (wooden?) treaders to the brick supports.I have now sprayed the bare shell of the Thorley signal box and am currently cleaning up the castings of the rest of the component parts. I have an issue with the steps up to the signal box door. There are no exploded diagrams to show assembly and I am relying on the excellent set of photographs, accompanying the sales offer on eBay, that show various views of the finished model. The steps defy engineering logic with no visible means of support for the treads. I am going to have to rethink them and come up with a believable modification.
View attachment 279310
View attachment 279311
David
I guess you could make the risers from Plasticard, suitably scribed to match the brick work....
3 minutes of fame
3d printing, electronics and trams
Brill look forwards to that, this is my thread on the Red loco. Has got pushed back a little due to the want of couplings (arrived) and some detail that will arrive when it arrives.dunnyrail , I've finished printing the various buffers, cow catchers and bell etc. Will post pictures once they are cleaned up!
Loving the "Red Loco". Do you have any details on it?

Red Battery GRS Pecket Loco Conversion using Fosworks and NiMh Batteries with My Loco Sound.
I bought this loco for around £145 back in October 2020. I had been involved with suggesting the price to a lady that had asked us for some values and as nobody appeared to be interested I took the opportunity to buy it as I thought it looked rather nice. It is a Piko 0-6-0 Chassis with what I...
casey jones snr
Registered
You've got the puns down to a T, PhilpDoes he normally keep it in his Golf-Bag... With his Drivers!

David1226
Registered
Yes. you've got to go a fair way to beat him.You've got the puns down to a T, Philp
David

