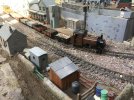
Yes I did, post edited thanks.No pics but in the last few days I have been spraying up two Toy Train box cars, one grey primer and the other red.
The grey primed one had a second coat of Ford Tuscan beige yesterday and once I have dealt with a couple small faults on one door will be reassembled, minus the roof.
The red primed one will be sprayed Rover Russett brown as soon as weather permits (thundery showers today told me front and back gutters were blocked yet again!). Looking again at the rattle can, I see the primer should have been grey, but I think red will do just as well.
The roofs of both will be Rover Arum white. Arum is a strange name for a paint, presumably it's the colour of the arum lily. Confusing, though, as alum is also white, hence I think you misread, Jon.
You are using an out of date browser. It may not display this or other websites correctly.
You should upgrade or use an alternative browser.
You should upgrade or use an alternative browser.
What happened at your workbench today?
- Thread starter Henri
- Start date
I spent today finalizing a repair to the articulation on my Ge 6/6 II "Scuol". Don't ask how it got broken! . I've got no one to blame but myself
 . I'm just surprised how little damage was done after falling about 3 feet onto my patio's concrete pavers.
After opening up the loco to assess the damage I decided to approach the repair in multiple steps. I glued the broken piece of the frame circled in the photo back in place with ca adhesive. I did this about a week ago. So the glue had plenty of time to cure while I waited for some part 2 epoxy to arrive - a West System™ Gflex 650 Aluminum Boat Repair kit. This kit includes epoxy and a strengthening filler that can be added to thicken the mixed epoxy.
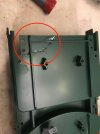
This next pic gives some idea how the two frame halves are attached together.
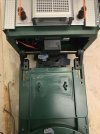
I roughened the area to be epoxied with coarse sandpaper and also drilled a number of small holes through the frame to give the plastic some "tooth". I then cleaned the area with acetone where the epoxy was to be applied. The area between the stiffeners molded into the frame.
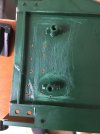
Next I mixed up a batch of the epoxy and "wetted" the repair area with un-thickened epoxy. Some of the thickener was then mixed into the epoxy. The thickened epoxy was smeared on the repair area and used to create fillets for the molded frame stiffeners.
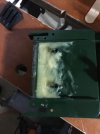
I allowed this to partially cure, about three hours, till the surface was still tacky but some of the bumps could be smoothed. Then I laid on some fiberglass matting I had on hand from another job. The fiberglass was wrapped around the repair area to the underside of the frame.
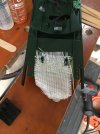
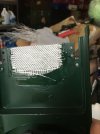
The tackiness of the partially cured epoxy held the fiberglass in place until it could be wetted out with a freshly mixed batch of epoxy. I laid on two more layers of fiberglass while I had the freshly mixed epoxy available.
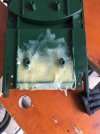
I probably should have waited a couple of hours between fiberglass layers but impatience got to me. The more I tried to smooth the epoxy impregnated fiberglass the uglier it became. I decided to quit while I was ahead. The epoxy will take about two days to fully cure. I'll see where things are then. Hopefully, the loco will be ready for re-assembly without too much further work.
After opening up the loco to assess the damage I decided to approach the repair in multiple steps. I glued the broken piece of the frame circled in the photo back in place with ca adhesive. I did this about a week ago. So the glue had plenty of time to cure while I waited for some part 2 epoxy to arrive - a West System™ Gflex 650 Aluminum Boat Repair kit. This kit includes epoxy and a strengthening filler that can be added to thicken the mixed epoxy.

This next pic gives some idea how the two frame halves are attached together.

I roughened the area to be epoxied with coarse sandpaper and also drilled a number of small holes through the frame to give the plastic some "tooth". I then cleaned the area with acetone where the epoxy was to be applied. The area between the stiffeners molded into the frame.

Next I mixed up a batch of the epoxy and "wetted" the repair area with un-thickened epoxy. Some of the thickener was then mixed into the epoxy. The thickened epoxy was smeared on the repair area and used to create fillets for the molded frame stiffeners.

I allowed this to partially cure, about three hours, till the surface was still tacky but some of the bumps could be smoothed. Then I laid on some fiberglass matting I had on hand from another job. The fiberglass was wrapped around the repair area to the underside of the frame.


The tackiness of the partially cured epoxy held the fiberglass in place until it could be wetted out with a freshly mixed batch of epoxy. I laid on two more layers of fiberglass while I had the freshly mixed epoxy available.

I probably should have waited a couple of hours between fiberglass layers but impatience got to me. The more I tried to smooth the epoxy impregnated fiberglass the uglier it became. I decided to quit while I was ahead. The epoxy will take about two days to fully cure. I'll see where things are then. Hopefully, the loco will be ready for re-assembly without too much further work.
Last edited:
JimmyB
Now retired - trains and fishing
I recently acquired a couple of points (switches) with LGB 3 terminal (1206) motors, so a bit of head scratching and google, and have converted them to tow wire operation
This was the initial trial with a couple of 1N 6353B C753 diodes I had "lying" around:
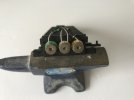
Though this worked, the motor was a bit sluggish, I assume because of the voltage drop through the diodes. A search and a couple of 1N 4007 were found, and these worked very well, and fit inside comfortably:
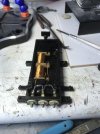
Power is apllied to the two outer terminals, alternatively via a momentary switch. The weekends test is to see if the Revo works them, it should do
This was the initial trial with a couple of 1N 6353B C753 diodes I had "lying" around:

Though this worked, the motor was a bit sluggish, I assume because of the voltage drop through the diodes. A search and a couple of 1N 4007 were found, and these worked very well, and fit inside comfortably:

Power is apllied to the two outer terminals, alternatively via a momentary switch. The weekends test is to see if the Revo works them, it should do
Chris Vernell
45.29 N, 75.75 W
Making slow progress painting the goods shed trim. Unsteady hands make fiddly work 
Greg Elmassian
Guest
Those first "diodes" were actually Zener diodes, with a forward voltage drop of 1.4 volts, as opposed to the 0.7 volt drop on a normal silicon diode. That surely would make a difference, not to mention that you really did not need the zener function. Had to look that part number up.
Greg
Greg
When I started to re-assemble my Ge 6/6II I saw this in the other half of the loco frame :
:
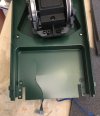
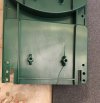
I did the same epoxy/fiberglass repair to this as was done to the frame half previously repaired. I was a bit more patient and let the first epoxy wetted fiberglass mat partially cure for a couple of hours before putting on two more layers. It looks a lot neater. Here's looking from the top and bottom.
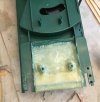
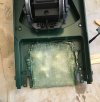
A couple of shots of the re-assembled frame.
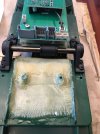
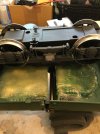
The repair does not interfere with the free movement of the Ge 6/6 II center truck. It is hidden by the loco frame side skirts and is not visible. I think the frame may be stronger now than when it came from the factory - but don't intend to test it!
And - here she is back in revenue service after getting out of the repair shops:
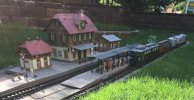
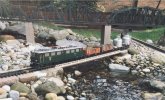
I did notice the front cab step got dinged and need to order a replacement from LGB Gartenbahn, Massoth, Pola im Modell-Land.de. One of the snowplows got busted in the locos fall too. Modell-Land sent me two replacements (figured I'd order second as a spare) in an express envelope for only €2.52 postage. Ordered on the 15th and in-hand on the 22nd. Can't beat that service!


I did the same epoxy/fiberglass repair to this as was done to the frame half previously repaired. I was a bit more patient and let the first epoxy wetted fiberglass mat partially cure for a couple of hours before putting on two more layers. It looks a lot neater. Here's looking from the top and bottom.


A couple of shots of the re-assembled frame.


The repair does not interfere with the free movement of the Ge 6/6 II center truck. It is hidden by the loco frame side skirts and is not visible. I think the frame may be stronger now than when it came from the factory - but don't intend to test it!
And - here she is back in revenue service after getting out of the repair shops:


I did notice the front cab step got dinged and need to order a replacement from LGB Gartenbahn, Massoth, Pola im Modell-Land.de. One of the snowplows got busted in the locos fall too. Modell-Land sent me two replacements (figured I'd order second as a spare) in an express envelope for only €2.52 postage. Ordered on the 15th and in-hand on the 22nd. Can't beat that service!
playmofire
Registered
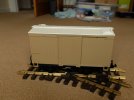
Well, this happened at what acts as my workbench some days ago, the first repainted LGB Toy Train box car finished in Ford Tuscan beige with a Rover Arum white roof. The latter had four coats to get the depth I wanted. The beige colour doesn't come though too true in the photo, it's really browner but varying exposure or fiddling about with the image don't help even with exposing with a grey card.
Next stage is to experiment with the roof line, turning it into a curved roof. I've a number of ideas to try out.
The final stage will be some transfers and logos to turn it into a private owner's van. I'm thinking mid-1930s and maybe Raleigh Cycles with an old advert on either side and the company name on both sides.

The Shed
Citizen of the Republic of the North East.
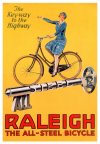
Something like this perhaps?........................I'm thinking mid-1930s and maybe Raleigh Cycles with an old advert on either side and the company name on both sides.
View attachment 290847

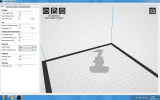
Just for interest, somebody has kindly created a 3D printed Raleigh Logo......
playmofire
Registered
The Shed
Citizen of the Republic of the North East.
That was an advert I had in mind at first, but a vertical one goes better with the space available so I have these two in mind:
View attachment 290879
View attachment 290881
How do I unlurk the Raleigh logo, please?
Can be found here......... 3D Printable Raleigh Bike Logo by Andrew Forster
casey jones snr
Registered
First task of the day was to change a defective gas regulator on my newly acquired Roundhouse Jack. It was a bit fiddly to do. The new regulator works fine but it looks like I need a new pressure gauge. A phone call to Roundhouse on Monday.
Last edited:
Chris Vernell
45.29 N, 75.75 W
First bicycle I rode, back in the early '50s, was my aunt's pre-war(?) Raleigh. It had the full chain case like this one. Small as I was, I was able to ride it because it was a woman's frame, so I could stand on the pedals.
The Shed
Citizen of the Republic of the North East.
Can be found here......... 3D Printable Raleigh Bike Logo by Andrew Forster
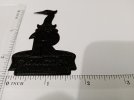
Did a trial as quick 3D print, the picture does not really do the print justice, does look better in real life, with the appropriate colour scheme, would look good.
Gérard Baudoin
Registered
playmofire
Registered
Found it, thanks.
Can be found here......... 3D Printable Raleigh Bike Logo by Andrew Forster
playmofire
Registered
It does look good. Would you PM me with info on cost for two, please.Did a trial as quick 3D print, the picture does not really do the print justice, does look better in real life, with the appropriate colour scheme, would look good.
View attachment 290967
I notice on your blog you have info on the Wangerooge Railway. Did you know that it was the building of that railway and the arrangement in 1899 for the German Navy to use the line that led to Erskine Childers' novel "The Riddle of the Sands", written as a wake up call to the British government as to the implications of what was happening and probably the first modern spy story?
casey jones snr
Registered
The Shed
Citizen of the Republic of the North East.
P playmofireIt does look good. Would you PM me with info on cost for two, please.
I notice on your blog you have info on the Wangerooge Railway. Did you know that it was the building of that railway and the arrangement in 1899 for the German Navy to use the line that led to Erskine Childers' novel "The Riddle of the Sands", written as a wake up call to the British government as to the implications of what was happening and probably the first modern spy story?
No I was not aware, thanks for the info, added to the Crimbo wish list..
Re 3D prints, drop me a message with your details on, and I'll post out a couple of 3D prints to you, no costs required.
PS: Can you give me a day or two, see post in Coffee Lounge re the Sista Hood, 3D printer is located in the garden room!
Which is presently occupied by a Chainsaw impressionist!
ARIA31
Registered
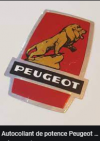
for Gérard Baudoin and other people interested in this question !
The initial home town of Peugeot is in Sochaux.
Sochaux is in the so called région Franche Comté in France.
The Franche Comté emblem is a lion.
I am now in Toulouse area but my family originated from Franche Comté and particularly close to Sochaux.
Several members of my family worked by Peugeot.
The initial home town of Peugeot is in Sochaux.
Sochaux is in the so called région Franche Comté in France.
The Franche Comté emblem is a lion.
I am now in Toulouse area but my family originated from Franche Comté and particularly close to Sochaux.
Several members of my family worked by Peugeot.

