What happened at your workbench today?

It being too (word unsuitable for Puggsie's delicate buccanears) hot and sticky outdoors for rattlecanning, I resorted to the air-conditioned basement and paintbrushes.
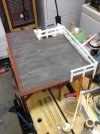
20210811_143221.jpg
The gravel loader decking has gone from primer red to burnt umber to a raw umber wash to a grey wash to suggest gravel dust. The red margin is where the hopper building will sit.
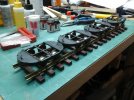
20210811_143255.jpg
The Hudson chassis are painted (Testor's gunmetal black and rust) and ready for a test run. Bodywork still under consideration.
 
As I extremely like to see pictures of WIP projects, why not have a general thread? Also you can display your workbench in various states of operation...

At the moment I’m working on the second RTM wagon, which originated as an LGB 4033 Chiquita wagon.

View attachment 263301

View attachment 263300

Never ever throw away the pieces! They DO come in handy!

View attachment 263299

Secret stash of assorted glue. Yes I use them all!
Hi, just looking at your workbench photos. do you use 32mm or 45mm track? Also what scale is the Y8? I am building a couple on Playmo RC chassis.
 
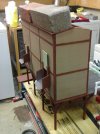
Hoping that I haven't forgotten something, I have glued the gravel hopper "house" to its deck and glued two quarters of the roof on the house (the roof comes in four pieces). Two 1:1 bricks are weighting the joints until the glue sets.
20210812_122106.jpg
 
Last edited:
With the 'stones' being used for other duties...

I hope that will not interfere with your laundry duties?
:wondering::p:giggle:
 
Hoping that I haven't forgotten something, I have glued the gravel hopper "house" to its deck and glued two quarters of the roof on the house (the roof comes in four pieces). Two 1:1 bricks are weighting the joints until the glue sets.
View attachment 288827
Great build Chris,but those bricks to my mind are just slightly overscale? just sayin`;););):D
 
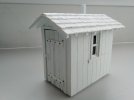
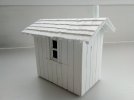
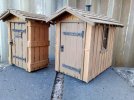
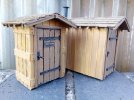
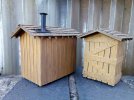
Loads of spare half and off cut sheets from my town build so thought I would use at least some of them up so I threw a shed/ hut together today,not in black and white but the area it was taken in was all white including the build,needs paint,the plan was to build two but alas time ran out!!!IMG_20210815_155707.jpgIMG_20210815_155719.jpgIMG_20210815_155731.jpg
 
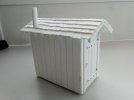
Knocked up no 2 shed(no pun intended) and finished off the first one,both now painted and finished,the smoke stack cover is a spare car hub cap,never throw anything away! IMG_20210823_185503.jpgIMG_20210823_185521.jpgIMG_20210823_185546.jpg
 
How is it [Revo] working out Jimmy?
Graham, received the the (switch control) Rx yesterday via Fine Scale Brass (UK), read the manual a few time, and will look at fitting over the weekend, progress report to follow.
 
I have bent no plywood and installed no electronics, but I did shuffle down to the basement and overcoat the red primer on my coaling stage with burnt sienna for the brickwork and raw umber for the wood. Also sienna'd the one wall of the goods shed that I had primed last week.
I did make bent corners for a couple of modules on my Thomas show layout a few years back, but I used 1/16" flexible aircraft ply. It installed easily and looked good, but one corner was damaged in transport when something went right through the thin ply. The "shell hole" was covered by a curtain when on display ;). Eventually I changed the design of the layout to use fewer modules (easier setup and takedown) and the fancy corners were binned.
 
As some of you will know I have made my motorised points (switches) remote with a Revolution, the issue for some points is you cannot always tell which way it is set at a distance so I bought a pair of LGB 1204 Switch Track Signal Lantern, the first fitted fine and operates well. The second this is where the story starts:
The point motor was a Piko, so I needed to swap it for an LGB motor, as the Piko motor will not drive the lantern. An LGB motor identified in the engine shed area, motor removed and Piko motor fitted, and then I notice the older (two wire) motors do not have the hole to drive the lantern. A second motor is identified with the correct drive shaft, motors swapped (again) only to find the pin that drives the point is snapped off on the side I need. In the house I have a spare motor, but the case is cracked, but has the newer drive shaft. Tops removed and drive shafts swapped, but it does not operate correctly (or at all really), tops of and the drive cogs are of a different diameter, and so the smaller cog does not engage with the rack. Eventually the whole innards are swapped, the motor assembled, and we have a working motor and lantern:

IMG_1230.JPEG
 
Having done the Rover Alum (edit Arum (thanks Playmofire I did misread))White coat all over Friday yesterday was mask up then a second coat to just seal up the masking tape. Today was Rover Iomole Red this morning with the hope of a second coat. Then it started raining so I expect I will do this second coat in the shed before I walk Barney.
F1A30300-F7CA-45DD-918D-39CA529EE1B2.jpegF1A30300-F7CA-45DD-918D-39CA529EE1B2.jpeg
 
Last edited:
No pics but in the last few days I have been spraying up two Toy Train box cars, one grey primer and the other red.

The grey primed one had a second coat of Ford Tuscan beige yesterday and once I have dealt with a couple small faults on one door will be reassembled, minus the roof.

The red primed one will be sprayed Rover Russett brown as soon as weather permits (thundery showers today told me front and back gutters were blocked yet again!). Looking again at the rattle can, I see the primer should have been grey, but I think red will do just as well.

The roofs of both will be Rover Arum white. Arum is a strange name for a paint, presumably it's the colour of the arum lily. Confusing, though, as alum is also white, hence I think youR misread, Jon.
 
Last edited:
Ooh, I have discovered that satin-finish "Hunt Club green" spray (i.e. hunter green) does a nice job on the goods shed "woodwork".
Dark green is my chosen trim colour: No doubt I shall be drummed out of the dark and light stone club.
 
Back
Top