What have you been printing.

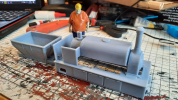
Meet PETG / Resin man, not the best name for a super Hero :)

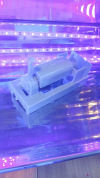
Head are arms in resin for details, Body chopped in half so you can print it with a filament printer laid flat with no supports , plus if I cut up enough heads, arms, etc. then I can end up with individual people rather than a lot of clones.. :think:

View attachment 278883
He looks 'armless enough... :D
 
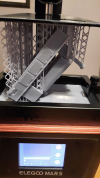
I assume this is now upside down, if you print from the bottom up!
Yes, you can see how it is drawn out of the vat of resin. This was just before it finished and was full withdrawn from the vat to drain off...

It's all very "Terminator", just a lot slower...
 
Correct. Build starts from the build plate at top and it steadily moves up out of the tank
Hm very interesting, having done some resin moulding what is the print time and how long can the resin stay liquid in the tank. Will never go round this route, just a nosey interested bystander do you see.
 
The resin will stay liquid until exposed to UV light - including daylight. It is stored in solid bottles to prevent light getting in and the printer normally has a filter cover over the top.

It's recommended you don't leave the printer "loaded" for more than about 48 hours and that you regularly strain the resin to remove any bits of failed print or hardened material.

The print process relies on an image being projected onto the bottom of the resin tank - which is made of a transparent material - FEP. In the Mars printer, an LCD screen and UV light source is used, while the original SLA machines use a scanning laser. The build platform is brought to within about 50uM of the bottom of the tank and the first exposure - about 60 seconds takes place. This hardens the material to the build plate and the plate will then move up about 5mm, "peeling" the solidified resin off the bottom of the tank and (hopefully) leaving it attached to the build plate. The plate then descends again so that the layer is just above the bottom of the tank and the process repeated - albeit for 6-7 seconds for each layer.

Once all 1000 layers or so are printed, the finished article is brought fully out of the tank and allowed to drain for at least an hour. At this point, it is removed, the supports removed and the model washed in IPA to remove uncured resin. The print is then baked in a UV source to fully harden it. Alternatively, on a sunny day, just leave it in the sun for an hour or so!

SLA is the earliest type of 3D printing, first demonstrated in the early 80s with the first commercial printers going on sale in 1987. Early machines were "right side up" so you needed a vat of resin at least the height of the item you wanted to print. Home printers are normally inverted with the transparent tank system, which uses less resin, but can lead to failed prints due to the mechanical interface for each print layer. This is why you print at strange angles to reduce the peeling forces required on large surface areas.

Hope this helps!

If anyone wants any bits resin printing, happy to oblige for the cost of the materials. As an example, this loco body cost about £7 in materials and consumables to print.
No disrespect to filament printer, but resin does look a lot better, there seems to be no striations, and generally overall a smooth exterior. Jon did ask about timing, so the loco body in #182 how long to actually print this.

Another assumption is there is only 1 type of resin, unlike filament, and I assume again this has similar properties to cast resin.

Last point, that is a very kind offer to print bits, but i would suggest most people who would want something would not have the required file or software, and could take some time to produce a file for printing.
 
Many thanks for the extremely informative reply and offer. You indeed have had your “3 minutes of fame” and I expect many more.
 
No disrespect to filament printer, but resin does look a lot better, there seems to be no striations, and generally overall a smooth exterior. Jon did ask about timing, so the loco body in #182 how long to actually print this.

Another assumption is there is only 1 type of resin, unlike filament, and I assume again this has similar properties to cast resin.

Last point, that is a very kind offer to print bits, but i would suggest most people who would want something would not have the required file or software, and could take some time to produce a file for printing.
Yes, there's various resins, including ones with more flex, hardness, opacity etc. Not quite the range as with FDM and colours tend to be more muted with grey or white most common. I do have translucent and solid red, as well as some "ABS like" which is stronger than the standard photopolymer.

The loco - 7mm scale took 5 hours to print, which is a little longer than my FDM would have taken, but the quality is not comparable. The downside with resin printing is the setup and clean down is much more involved than with FDM. The resin tank needs emptying back into the bottle, the FEP surface examining and replacing every 200 hours or so and the LCD won't last forever. That being said, if I add up the amount of time I've spent replacing nozzles, rebuilding hot ends, re-wiring motors and all the other things my printer seems to need on a regular basis, it's probably not dissimilar! The difference being I don't need to wear gloves to handle the filament or use copious quantities of IPA to clean up the prints!!

The offer to print stuff extends to things from print sites like Thingiverse as well. This might include people at a specific size to fit a model, parts to fit a scratch build or just something that they've designed but doesn't print well on their FDM machine.
 
Many thanks for the extremely informative reply and offer. You indeed have had your “3 minutes of fame” and I expect many more.
Thanks. If you want some bits for your Y6 tram, I have some designs for the cow catchers and buffers that might save you some work :)
 
One final shot of the Hunslet for today, this is it curing in my converted breadbin come curing oven! It has a bunch of UV LEDs in there and the shiny interior bounces it around nicely. A model like this probably needs about 2 hours to fully cure.

1610619459804.png
 
Thanks. If you want some bits for your Y6 tram, I have some designs for the cow catchers and buffers that might save you some work :)
That sounds interesting but not sure how the cow carptchers would scale out as I am doing G3, ought to be the same but if you have narrowed the body down there could be a problem ( on my G3 one they need to be about 113mm wide). Buffers and Chimney would probably work Ok. There is also a roof mounted pipe that comes out of a Roof Mounted round bit roughly chimney size but quite short and a bell. Both J70 and Y6 were similar in these regards. Not really a problem as I can fabricate out of Brass but if they can be printed and you have done them well why not? Perhaps you may like to mail me with details of how we can move on with your kind offer?
 
I can certainly print the cow catchers at a width of 113m, same with the buffers. There should be a chimney, condensing pipe and bell on the roof, all of which I will be printing for mine, so could scale up for yours.
 
Open to offers... And I will donate the money to the local food bank.
It comes with a matching wagon and I'll print a Dave and Natalie to the correct scale to go with it :)

1610649346021.png
 
Back
Top