What have you been printing.

Plastics by their nature are very complex. Just because two might be noted down as ABS or PLA does not mean that they will necessarily have the same properties. I would not be surprised if the ABS filaments being supplied by different suppliers are all slightly chemically different in some way. Usually a manufacturer's specific blend of the material is unique to them. More to the point the people supplying the filament won't be making the blends, that will probably come from BAYER, or BASF or whoever as a bag of plastic pellets. They are then free to mix whatever that like in with that bag. Usually to add colour, but it can include other materials to change properties such as the stiffness or mouldability. This will all have an effect on the actual mechanical properties of the final filament.

LGB use a plastic called Luran-S, which is just a brand name for a type of polymer known as ASA. ASA is commonly used in bare automotive body panels, mainly because of its increased UV resistance over ABS. There's nothing special about it per se, it's just more suitable. You can buy ASA filament, but again this won't necessarily yield the same results as an LGB moulding.

The type of 3D printing can have an effect too. The layered deposition type used by most of the home printers has a natural weakness in the fact the layers are essentially separate and stuck together while the polymer is still is its 'plastic' stage. You can pay a few companies to laser sinter powder for you, which will be slightly stronger than filament printing but still not quite up to an injection moulding. When I spent some time with the Red Bull F1 team back in 2010, they were using this method to print new gearbox gears overnight.

What I see missing from a lot of 3D printed parts is what you might consider 'good' plastic part design. When you have to plan for how to remove something from a injection mould and getting the design wrong might mean a whole batch of parts warping or some very expensive tool mods, you are forced to consider the design more. Obviously the same concerns don't apply to a home printed part. Plastic parts by their nature like uniform thicknesses and lots of support. If you look along the flat, long plain edge of an LGB open wagon, you can see the sink marks and warping caused by trying to force it to be a big open box. All plastic parts will warp and shrink as they cool, especially long flat things like the sides of buildings or wagons. In ordinary moulded part design I would get around this with thin ribs, walling the part or taking thickness out of the joints where 2 walls meet. It's easy to pick up an exisiting part, take the measurements, CAD up an exact replica and print a copy. Usually though, I think it needs to be a little more complicated :think:
 
Interestingly, humidity also has a noticeable effect on ABS too. Throughout the first few months of the parts lift it will be slowly absorbing moisture from the air. Mould shops spend lots of time and effort drying out their bulk material before it is moulded. When I am testing I see quite a difference in the properties of identical parts depending on if they have been air freighted straight from the manufacturer, or spent 6-8 weeks at sea in a container.
 
Last edited:
The type of 3D printing can have an effect too. The layered deposition type used by most of the home printers has a natural weakness in the fact the layers are essentially separate and stuck together while the polymer is still is its 'plastic' stage.
Yup - that's what happened to the gearbox casing, Ricky - the layers came apart :nod::nod:
 
Again, not wishing to knock anybody's modelling work in any way, but I do have some sympathy with Philp's question.

I had a 3D printed gearbox which didn't stand up to much hard wear. Don't know whether it was the oil, the grease, or strain, but it fell apart in a pretty short space of time.

This is not a knock, or a put down, but how do we research the longevity?


Very simply... Try it..
How long do I have to leave a foambord building out side, before it's accepted as OK..
If it out last a wooden version.?. Mdf version..
Well it has..
Busy printing out a bridge in pla..
And guess what.. Time will tell.. Of course, it might fail.. So what.. I make another.

1 roll of £13.00 pla filament is no big gamble, compared to leaving a £30 waggon out is it.. IMG_20200817_123725.jpg
 
When you show something that you have printed, can you please say if it was printed with PLA or ABS filament?
My test print was with PLA and it seems to be a bit 'rubbery ' ( the test dog) is this correct or do I have the wrong filament?
Thanks
Dave
Depends on the amount you fill it with I think... If you make it with less thick walls ect? All I can say is make sure your printing it at the right tempiture the filament manufacturer surgest with a hot bed?
We are all learning as we go..
 
Yup - that's what happened to the gearbox casing, Ricky - the layers came apart :nod::nod:

I would imagine you were pretty much there with your thinking of the plastic/oil/strain combination :) I've yet to run my own printed gear cases for anything more then test runs yet, but I will be interested to see if the case or the gears go first :think:
 
Very simply... Try it..
How long do I have to leave a foambord building out side, before it's accepted as OK..
If it out last a wooden version.?. Mdf version..
Well it has..
Busy printing out a bridge in pla..
And guess what.. Time will tell.. Of course, it might fail.. So what.. I make another.

1 roll of £13.00 pla filament is no big gamble, compared to leaving a £30 waggon out is it.. View attachment 271724
Yerst, when it comes to buildings - and I don't have many - I'm still in Luddite mode, and am just working out that the one laser cut timber building that I have has turned out to have a much shorter life than I imagined.

At the moment, it is now fast becoming a derelict building (the building having gone out of use during the Flu-19 lockdown ;);) ) but I am seriously considering a new building to replace this and the standard Piko Green River Station (a birthday gift from SWMBO in the early days of the first garden railway).

I have got as far as buying some second hand windows :clap::clap::clap::clap::clap:
Wood does not survive that long outside particularly kit built building sizes. Some last longervthan others of course to confuse the septic. Without doubt though any wood that will sit outside in long term damp will go soft and be unrecognizable after a year or three. Peter Jines in his book on buildings described a method that works for timber involving scorching and PVA, not for the faint hearted but appeared to work for him though again nit on wood kit buildings.
 
Wood does not survive that long outside particularly kit built building sizes. Some last longervthan others of course to confuse the septic. Without doubt though any wood that will sit outside in long term damp will go soft and be unrecognizable after a year or three. Peter Jines in his book on buildings described a method that works for timber involving scorching and PVA, not for the faint hearted but appeared to work for him though again nit on wood kit buildings.
Carn't remember how long ago I put it out there. I did bring it in last winter to do a few minor repairs, but it'll be OK as an abandoned, deteriorating run-down shack while I work out how to build a suitable deeepot :mm::mm::mm::mm:
 
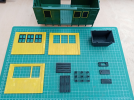
Yet more windows!

Door & window infills for the Post Van.

2 cu yd skip.

Euro pallets and a lightweight version.

Working on a standard light fitting for LGB stock.

And even more windows..............


3D Printing.png
 
Working on a standard light fitting for LGB stock.
If it helps I thnk I have one I did for a Stainz front light replacement.
Found it! This one -
front light.jpg
 
Last edited:
Thanks for the replies during the day, it appears that for 3d printed things to go outside, the best option is to use ABS and paint it fairly soon after it has been printed, this , presumably, will seal the print and hopefully give it some longevity.
Dave
 
If anyone is looking for a neat looking buffer..


Have you ever bent a whistle

whistle.jpg

or lost a bell?

Bell.jpg
 
DaveB2 DaveB2 , thanks again for the email with the attached stl files, yes I have, and doubt many others have 'bent' a few whistle's over the years!:)
 
One of the things that is nearly impossible to get hold of is sheets of what we Brits call shiplap and what I think in the US is called sidings.

Now, how difficult it would it be to print off some standard sized panels? For 1:20.3 you'd ideally want a panel to be 150 mm high - lengths could be butted or joined with fake timber columns.

  • Would it be workable?
  • Would you be able to cut window and door openings?
  • What would you use for adhesive?
  • Would it be too expensive?

Just thinking out loud - from the novice end of the spectrum :emo::emo:
I can see your thinking there, build your building "just like the real thing" good name for a company ;)
 
Now, how difficult it would it be to print off some standard sized panels? For 1:20.3 you'd ideally want a panel to be 150 mm high - lengths could be butted or joined with fake timber columns.

  • Would it be workable?
  • Would you be able to cut window and door openings?
  • What would you use for adhesive?
  • Would it be too expensive?

Not too difficult I would think. It should be just a flat sheet, with a repeated groove pattern to resemble the laps. Columns might give a stronger final product than butt joints I think. This could be just a square or round section, with however many slots you needed extruded through it at the width of the panel. As long as you knew the dimensions of your doors and windows you could cut the hole directing into the CAD model.

I think superglue is usually pretty effective for ABS, I am happy to be corrected though. Cost wise, I don't think it would be the most efficient use of material but it might be possible to economise the design a bit while still retaining strength.
 
One of the things that is nearly impossible to get hold of is sheets of what we Brits call shiplap and what I think in the US is called sidings.

Now, how difficult it would it be to print off some standard sized panels? For 1:20.3 you'd ideally want a panel to be 150 mm high - lengths could be butted or joined with fake timber columns.

  • Would it be workable?
  • Would you be able to cut window and door openings?
  • What would you use for adhesive?
  • Would it be too expensive?

Just thinking out loud - from the novice end of the spectrum :emo::emo:

One thing to note most home FDM printers only print at 0.1mm layer height at best, and a lot of people will print at 0.2 for speed so if you imagine the profile of ship lap you don't get many layers to define a smooth angle shape, what does work better is the idea of tongue and groove type cladding as its a flat surface with just a grouve cut into the surface to define the seperate boards. don't know if that makes sense,

If you cut a holes in a printed surface depending on how thick the part is the center is not a solid type structure usually, it can be but it takes for ever to print, usually you have a solid top and bottom surface with a honey comb type infill in between so if cutting into that structure by hand you would expose the infill around the holes you cut. If you cut those holes prior to printing in the model then it builds solid walls around the holes for you while its printing.

Super Glue really does stick the stuff together and you fingers etc etc.. :)


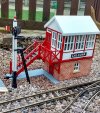
The signal box below all the upper is 3D printed , the grooved sidings, windows and doors were printed to size to fit in between the uprights

train-08-04-06.jpg
 
Last edited:
Back
Top