You are using an out of date browser. It may not display this or other websites correctly.
You should upgrade or use an alternative browser.
You should upgrade or use an alternative browser.
What have you been printing.
- Thread starter mike
- Start date
richand26mhz
Registered
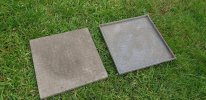
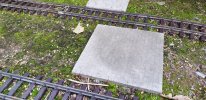
Are you putting any strengthening in as with the depth at size (9” square?) might be a little brittle. Perhaps some flayt anodised ally chicken wire?I printed off another negative. Works better with less depth in the mould. I sprayed the mould with wd40 before applying the concrete and it just slipped out when almost cured.
Rhinochugger
Retired Oik
Yep, or nylon mesh - garden plant covering for the use ofAre you putting any strengthening in as with the depth at size (9” square?) might be a little brittle. Perhaps some flayt anodised ally chicken wire?
Concrete is strong in compression, but has no tensile strength worth talking of.
As a young, impressionable teenager just having done O levels, our physics master arranged two trips, one to Ewell Technical College where they showed us how they tested concrete for strength by crushing a cube - impressive. Then they took a concrete cylinder, laid it on its side and crushed it, and it split apart vertically at next to nothing - that was the tensile test.
At that time, I went on to do language A levels, and never had an inkling that I would spend a lifetime in the construction industry
Tanker man
G scale and 5 inch ride on
Observations after 2 weeks with a 3d printer.
Ok, there is a lot of information on the micro SD card, if you are brave enough to plug it into your PC. The slicing details , from the card, would not load onto my iMac, research suggests that it is an old version and it is better to download Cura from the internet, this I did and set it up to work with my Ender 3pro.
I bought a spare micro SD card to download files from 'Thingiverse' , my iMac does not recognise the blank card in the USB adapter provided with the printer, however, the card came with a standard adapter, which plugs into the slot on the iMac. I have, successfully downloaded a few bits from 'Thingiverse' moved the file into the slicer and saved it on the spare SD card, which when transferred to the printer, prints away merrily!
I ordered some black PLA filament from Amazon, which seems to work well, in fact I have just ordered a real of white, of the same type. Less than half the price of the roll that I ordered with the printer.
I, now feel confident to download items from 'Thingiverse' and print them, I seem to have got the bed level on the printer and my prints are good.
My next challenge, is to master a CAD drawing package but with the help of YouTube videos and the net, I hope to be able to archive something soon................watch this space!
Dave
Hm that means she does not understand the effort involved with getting to grips with the tech, bit like trying to understand women really.There's so much to see.. You guys have been busy.. Wify says I'm getting obessesed with the printer.. We don't know what she means..
Last edited:
musket the dog
Registered
Hey all, this is my first post on the forum. This week printing its been in pieces to
Wow, looks very impressive, certainly a big piece of kit. Is it one of the Leek and Manifold tanks?
I initially thought that but I reckon it is either an Oz or NZ loco.Wow, looks very impressive, certainly a big piece of kit. Is it one of the Leek and Manifold tanks?
It isn’t a kit I’m afraid. It is a South Australian Railways F class I cannot claim the Stl file drawings as my own. However the chassis development is.Wow, looks very impressive, certainly a big piece of kit. Is it one of the Leek and Manifold tanks?
I am using a flash forge adventurer 3 to print with sunlu abs plastic. the printer has issues with layer adhesion but this print has came out okay.
It isn’t a kit I’m afraid. It is a South Australian Railways F class I cannot claim the Stl file drawings as my own. However the chassis development is.
I am using a flash forge adventurer 3 to print with sunlu abs plastic. the printer has issues with layer adhesion but this print has came out okay.
Oh a nice loco and well printed be good to see it finished and a vid of it running pretty please.
ge_rik
British narrow gauge (esp. Southwold and W&LLR)
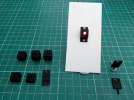
Now put all the bits together and, surprisingly enough, it works. The quality of the printing from my £80 printer isn't the best - particularly with taller parts, but with a bit of work I think it will look OK.Just finished printing the 60+ parts needed for the beam engine. Although there are 54 different parts, multiple copies are needed of some parts such as the linkages for the piston rod.
View attachment 271799
Also, the firmware on my cheapo printer includes a bug which prevents the z axis rising above 36mm. A flaming nuisance but not insurmountable as I simply chop the taller parts into pieces no taller than 35mm and will then glue them back together.
I could install a more recent version of the firmware if I could find a way to get the motherboard to communicate with my laptop. As it's Arduino based I might be able to find an alternative way of doing it. If the worst comes to the worst, a new motherboard (hopefully with bug free firmware) is only £20!
Rik
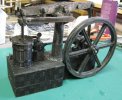
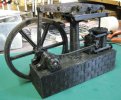
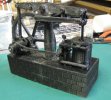
And what is more ....... it works!!
OK - it needs to be slowed down a bit. I've got one of those geared motors, but I need to modify the motor housing to take it.
Not bad for free ..... (apart from the cost of the plastic and the electric)
Rik
Rhinochugger
Retired Oik
Excellent, and if you're going to be seeing it inside a building, then the detail's fine - can you not just reduce the voltage?Now put all the bits together and, surprisingly enough, it works. The quality of the printing from my £80 printer isn't the best - particularly with taller parts, but with a bit of work I think it will look OK.
View attachment 272090View attachment 272091View attachment 272092
And what is more ....... it works!!
OK - it needs to be slowed down a bit. I've got one of those geared motors, but I need to modify the motor housing to take it.
Not bad for free ..... (apart from the cost of the plastic and the electric)
Rik
ge_rik
British narrow gauge (esp. Southwold and W&LLR)
I'm already only feeding 1.2v to the motor from a rechargeable cell, so not got much to play with.Excellent, and if you're going to be seeing it inside a building, then the detail's fine - can you not just reduce the voltage?
Rik
Rhinochugger
Retired Oik
I'm already only feeding 1.2v to the motor from a rechargeable cell, so not got much to play with.
Rik
Smaller motor then - I've got a couple salvaged from camera lenses
Excellent as ever Rik, I reckon the slight roughness from the printing process looks very like casted parts which in fact is what they will have been just machined around the working parts.Now put all the bits together and, surprisingly enough, it works. The quality of the printing from my £80 printer isn't the best - particularly with taller parts, but with a bit of work I think it will look OK.
View attachment 272090View attachment 272091View attachment 272092
And what is more ....... it works!!
OK - it needs to be slowed down a bit. I've got one of those geared motors, but I need to modify the motor housing to take it.
Not bad for free ..... (apart from the cost of the plastic and the electric)
Rik
ge_rik
British narrow gauge (esp. Southwold and W&LLR)
Yup! The easiest option as he also included a rig to hold the motor, battery and switch in the right position.and presumably you're running it as the original video you should us - shaft to wheel rim.
I'm just working on a Plan B - if that doesn't do the job then I might take you up on the offer...Smaller motor then - I've got a couple salvaged from camera lensesif you're interested.
Rik

