What have you been printing.

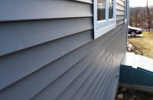
One thing to note most home FDM printers only print at 0.1mm layer height at best, and a lot of people will print at 0.2 for speed so if you imagine the profile of ship lap you don't get many layers to define a smooth angle shape, what does work better is the idea of tongue and groove type cladding as its a flat surface with just a grouve cut into the surface to define the seperate boards. don't know if that makes sense,

If you cut a holes in a printed surface depending on how thick the part is the center is not a solid type structure usually, it can be but it takes for ever to print, usually you have a solid top and bottom surface with a honey comb type infill in between so if cutting into that structure by hand you would expose the infill around the holes you cut. If you cut those holes prior to printing in the model then it builds solid walls around the holes for you while its printing.

Super Glue really does stick the stuff together and you fingers etc etc.. :)
OK, so, if your shiplap was actually a (f'rexample) two-layer construction, then the thick edge of each individual board would be hollow. Now, that's not too much of an issue because, as Jimmy says, if you're going to do it like the real thing, then at door / window openings and corners, you're going to put something to resemble a timber lining or framing.

Equally, if it was a two-layer process where the layers met at the thin edge of each individual board, then the sheets of shiplap would be pretty strong.

The other way, would be to design each wall specifically for its situation - i.e. make a 3D printed equivalent of a Pola kit, but then that be an awful lot of design work for a single use.

I s'pose you could design standard wall panels with doors and windows something like GRS did years ago with their carriages :think::think: The thing is that I've just bought a load of windows - haven't got any doors yet :oops::oops::oops:
 
The signal box looks great - but it's quintissentially British, and TG&V is quite a British thing.

But shiplap is a much more US thing, and I'm trying not to get too British. I did actually buy some thin plasticard that was shaped for shiplap, and have repaired the garage in Green River shanty town with it, but it's very flimsy, and would need to be glued to foamboard structure - that, and the fact that I have no idea who I bought it from at the Peterborough Show :rolleyes::rolleyes:

But this is the look - Silverton Depot is built this way.

1597849302478.png
 
However, Chama is built like this - with wide, vertical planks and timber beads to cover the joints - above the eaves line, it looks like painted shingles

1597849554496.png
 
The other way, would be to design each wall specifically for its situation - i.e. make a 3D printed equivalent of a Pola kit, but then that be an awful lot of design work for a single use.

It was :) so I made two and will add a third to my last station as it took hours drawing up all the bits both inside and out.

I'm not sure you would get the resolution to print ship lap if you made it 1mm think at the thin end and 1.5mm at the thick end say then the difference is only .5 mm that's only 5 layers on most printers so you would get a stepped type finish rather than a smooth angle like below if printed flat on the bed as a sheet

step.jpg
 
It was :) so I made two and will add a third to my last station as it took hours drawing up all the bits both inside and out.

I'm not sure you would get the resolution to print ship lap if you made it 1mm think at the thin end and 1.5mm at the thick end say then the difference is only .5 mm that's only 5 layers on most printers so you would get a stepped type finish rather than a smooth angle like below if printed flat on the bed as a sheet

View attachment 271786


Mmmm :wondering::wondering::wondering: I'm beginning to think Chama - 'cos I could do that with ordinary board :think: just add some evergreen strip for the joint covering :nod::nod:
 
The signal box looks great - but it's quintissentially British, and TG&V is quite a British thing.

But shiplap is a much more US thing, and I'm trying not to get too British. I did actually buy some thin plasticard that was shaped for shiplap, and have repaired the garage in Green River shanty town with it, but it's very flimsy, and would need to be glued to foamboard structure - that, and the fact that I have no idea who I bought it from at the Peterborough Show :rolleyes::rolleyes:

But this is the look - Silverton Depot is built this way.

View attachment 271779
Looks more like feather edge than ship lap.
 
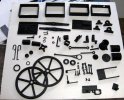
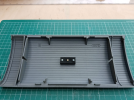
Just finished printing the 60+ parts needed for the beam engine. Although there are 54 different parts, multiple copies are needed of some parts such as the linkages for the piston rod.
IMG_0990.JPG

Also, the firmware on my cheapo printer includes a bug which prevents the z axis rising above 36mm. A flaming nuisance but not insurmountable as I simply chop the taller parts into pieces no taller than 35mm and will then glue them back together.

I could install a more recent version of the firmware if I could find a way to get the motherboard to communicate with my laptop. As it's Arduino based I might be able to find an alternative way of doing it. If the worst comes to the worst, a new motherboard (hopefully with bug free firmware) is only £20!

Rik
 
Looks more like feather edge than ship lap.
Yeah, I was thinking rustic clapboarding which is sometimes, wrongly :oops::oops: referred to as ship lap.

But then us simple builders ................ we're allowed to spell things two ways, curb and kerb are interchangeable, cill and sill, lintel and lintol.

But we only spell firkin one way - something is either two firkin long, or two firkin short :p:p
 
The beam engine looks really interesting Rik, I keep an eye out for the old Airfix beam engines with the thought of motorising one.

For one of my projects at uni we had to model and animate an assembly in CAD. I chose to build a Stirling beam engine. I must still have the files somewhere :wondering:
 
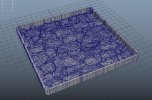
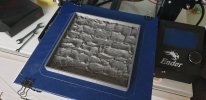
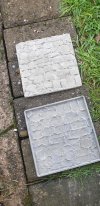
Hey, i have been experimenting with creating a negative mould for some brick tiles to cast in concrete for walls etc. I used height data from some photogrammetry to create the wall model. I then inverted the meshs faces and extruded walls to keep the cast in place.


Maya.JPG

20200816_083427.jpg

20200818_190059.jpg

seems to work ok. getting them out was quite difficult and a lot of the heigh areas got stuck in the concrete.

i'm now printing off a test piece to cast a platform section.
 
I used a mould release oil when casting in my wooden moulds. Maybe that might help?
 
Might it also be possible to seal the surface of the print? When we need printed parts to hold water at work we use masonry sealant, like Bostik Cementone, to seal the surface. Just thinking that if it can keep water in, it might stop the cement soaking in as it dries?
 
Might it also be possible to seal the surface of the print? When we need printed parts to hold water at work we use masonry sealant, like Bostik Cementone, to seal the surface. Just thinking that if it can keep water in, it might stop the cement soaking in as it dries?
richand26mhz richand26mhz , would something like this help, Polycraft Concrete Release Agent, you would have to check the info for the material you are using for the 3D print.

As for the company, just a long standing satisfied customer of their Resin Casting materials....
I'd be tempted to do both - having played with concrete professionally for many years, I can confirm that it's funny stuff with many quirks.

Anything that preserves the profile but separates the two surfaces (mould and concrete) has got to be beneficial :nod::nod:
 
Having made a concrete Viaduct some years back using Wood Mounds (MDF actually) I used a splash of Oil painted all over to assist with the release process. The Viaduct was representing a Concrete one thus no stonework involved, I have to say the process worked very well.
 
Having made a concrete Viaduct some years back using Wood Mounds (MDF actually) I used a splash of Oil painted all over to assist with the release process. The Viaduct was representing a Concrete one thus no stonework involved, I have to say the process worked very well.
There is a specific product in the trade - mould oil - it has a distinctive smell and seems to be the aftershave of choice for most shuttering chippies :oops::oops:
 
There is a specific product in the trade - mould oil - it has a distinctive smell and seems to be the aftershave of choice for most shuttering chippies :oops::oops:

Which is basically what I said in post 72 :)
 
Back
Top