You are using an out of date browser. It may not display this or other websites correctly.
You should upgrade or use an alternative browser.
You should upgrade or use an alternative browser.
What happened at your workbench today?
- Thread starter Henri
- Start date
Rhinochugger
Retired Oik
I'll update the idiot's end of the project in due course 

tac foley
Registered
I bought a nice used AML Gramps tank car off the bay of E for not a lot of money, even including £7.50 past and pokage. It was quickly opened up, only for me to find that the usual metal trucks of extreme scality had been replaced by Bachmann items of great cheaphood and plasticity, and e'en though the wheels WERE metal, they were not the usual scale 33" small flange items they ought to have been.............................................no returns, either.
Fortunately for moi, I'm not short of a few correct trucks, but I AM short of the correct body-mounted couplings.....................................................the Bachmann items, of course, have Bachmann's own couplings, truck mounted. With 20 ft radius curves on our layout, body-mounted couplings are the norm.
Now I'm here in UK, where to get a pair of the correct couplings is my next problem. The Bachmann items are not even drilled to take the cut lever activation chain.
Fortunately for moi, I'm not short of a few correct trucks, but I AM short of the correct body-mounted couplings.....................................................the Bachmann items, of course, have Bachmann's own couplings, truck mounted.
Now I'm here in UK, where to get a pair of the correct couplings is my next problem. The Bachmann items are not even drilled to take the cut lever activation chain.
Rhinochugger
Retired Oik
I'll have a look when I get home, which will be a week's time, but I don't think I have much, if any, of the Accucraft type. Most of my spare couplers are Bachmann, although I might have a couple of straight shaft for body mount. Whether one of those could be adapted for an Accucraft pocekt, and whether the AMS pockets are the same size as AML, I'm not sure.I bought a nice used AML Gramps tank car off the bay of E for not a lot of money, even including £7.50 past and pokage. It was quickly opened up, only for me to find that the usual metal trucks of extreme scality had been replaced by Bachmann items of great cheaphood and plasticity, and e'en though the wheels WERE metal, they were not the usual scale 33" small flange items they ought to have been.............................................no returns, either.
Fortunately for moi, I'm not short of a few correct trucks, but I AM short of the correct body-mounted couplings.....................................................the Bachmann items, of course, have Bachmann's own couplings, truck mounted.With 20 ft radius curves on our layout, body-mounted couplings are the norm.
Now I'm here in UK, where to get a pair of the correct couplings is my next problem. The Bachmann items are not even drilled to take the cut lever activation chain.
I know that the spring operation of the Accucraft knuckles is entirely different to the Bachmann effort.
Madman
Registered
I bought a nice used AML Gramps tank car off the bay of E for not a lot of money, even including £7.50 past and pokage. It was quickly opened up, only for me to find that the usual metal trucks of extreme scality had been replaced by Bachmann items of great cheaphood and plasticity, and e'en though the wheels WERE metal, they were not the usual scale 33" small flange items they ought to have been.............................................no returns, either.
Fortunately for moi, I'm not short of a few correct trucks, but I AM short of the correct body-mounted couplings.....................................................the Bachmann items, of course, have Bachmann's own couplings, truck mounted.With 20 ft radius curves on our layout, body-mounted couplings are the norm.
Now I'm here in UK, where to get a pair of the correct couplings is my next problem. The Bachmann items are not even drilled to take the cut lever activation chain.
As a buyer, you do have recourse. Simply stated, the item was not as described. You can open a claim to be refunded, even though the listing stated "no returns".
tac foley
Registered
As a buyer, you do have recourse. Simply stated, the item was not as described. You can open a claim to be refunded, even though the listing stated "no returns".
Dan, TBH, I just can't be arsed. I have the car, for about a third the cost of a new one, and if friend Rhinochuugger can't help me out, I'll likely cobble summat together that will serve.
Brixham
No buffers were hurt at this sign
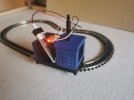
In my box of ‘fix this’ stuff were two point motors, one LGB, the other Piko. They both have seized solid screw terminals for the wiring connections.
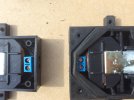
the top one is LGB.....quite an early one as the drive pinion is thin, the lower one is Piko...the armature assembly is removed by pulling upwards the rubber 'waterproofing' seals
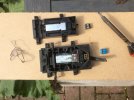
Even an application of WD didn’t free them up ( although a third was rescued after a spray and soak ).
So, to replace the connectors.
I had a couple to hand, a new one in blue, I was going to reuse the older black one but it was already well used so fitted a second blue new one.
The best way to remove the old connectors is to cut their legs off, and carefully remove the short bit of pin from the coil wires.
If you can’t get the wire free, then cut to leave as much length as possible. If there isn’t enough length remaining, there are a couple of turns around a former, one turn can be unwound.
Using fine glass paper, remove the insulating varnish from the ends, wrap around the new pins an solder up.
Check there is continuity before reassembling, both motor coils are about 24 ohms.
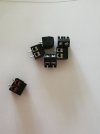
Where to get the connectors? Mine were from an electronic project, but I understand that PhilP of this forum stocks them. Currently not on his website, so you need to contact him directly. Price, 40p each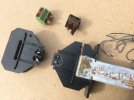
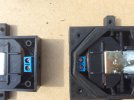
the top one is LGB.....quite an early one as the drive pinion is thin, the lower one is Piko...the armature assembly is removed by pulling upwards the rubber 'waterproofing' seals

Even an application of WD didn’t free them up ( although a third was rescued after a spray and soak ).
So, to replace the connectors.
I had a couple to hand, a new one in blue, I was going to reuse the older black one but it was already well used so fitted a second blue new one.
The best way to remove the old connectors is to cut their legs off, and carefully remove the short bit of pin from the coil wires.
If you can’t get the wire free, then cut to leave as much length as possible. If there isn’t enough length remaining, there are a couple of turns around a former, one turn can be unwound.
Using fine glass paper, remove the insulating varnish from the ends, wrap around the new pins an solder up.
Check there is continuity before reassembling, both motor coils are about 24 ohms.
Where to get the connectors? Mine were from an electronic project, but I understand that PhilP of this forum stocks them. Currently not on his website, so you need to contact him directly. Price, 40p each


Attachments
Last edited:
Strange you are on this, I have been messing with a couple as well today. One was well cooked with side and end plastic pin holder trashed likely due to point left on due to a dodgy switch. The other like yours had a dodgy screw, my plan was to get the good screws from the melted one but that did not work as the hole bit melted so a new wire in the good screw and another bit soldered to the connection with these going to a new terminal block. As it will be used indoors this not a problem.In my box of ‘fix this’ stuff we’re two point motors, one LGB, the other Piko. They both have seized solid screw terminals for the wiring connections.
View attachment 333281
Even an application of WD didn’t free them up ( although a third was rescued after a spray and soak ).
So, to replace the connectors.
I had a couple to hand in blue, I was going to reuse one but it was already well used so fitted a second blue one.
The best way to remove the old connectors is to cut their legs off, and carefully remove the short bit of pin from the coil wires.
If you can’t get the wire free, then cut to leave as much length as possible. If there isn’t enough length remaining, there are a couple of turns around a former, one turn can be unwound.
Using fine glass paper, remove the insulating varnish from the ends, wrap around the new pins an solder up.
Check there is continuity before reassembling, both motor coils are about 24 ohms.
Where to get the connectors? Mine were from an electronic project, but I understand that PhilP of this forum stocks them. Currently not on his website, so you need to contact him directly. Price, 40p eachView attachment 333282
View attachment 333284
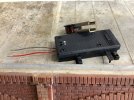
Repaired one at front waiting connector, trashed one at rear you should be able to see where end plastic melted. Side plastics pieces were 2 blobs of black plastic. Method of operation on layout that caused the problem was switch and separate push button. A different panel uses 2 way touch micro switches, neither a really good method for EPL point motors.
playmofire
Registered
Can you expand on this please?
Replacement screw terminal blocks for LGB point motors.Can you expand on this please?
40p each
Or
£1.50 for five.
Available from me:
phil@rctrains.co.uk
PhilP
MalOz_1957
Registered
I like these old carriages. Had a ride in a couple out of Douglas on holiday on IoM in '68 - loved them ever since. On my list to have a go at a couple once I finish a loco to pull them.I didn't think there was much point in producing a build log for the IOM H wagon, as it's been a straightforward 'locate and cement' assembly of parts that I laser cut before retiring. Suffice to say, I started work on it on September 5th
View attachment 333070
and have completed it more or less a fortnight later, albeit with a week in Wales along the way. Centre buffers were fitted and the pivot (that also doubles as a hook for those who use bog chain) was removed and fitted upside down.
View attachment 333071
Finally, the thing that marks out one of my builds from anyone else's...
View attachment 333072
I only went up to 2025 when I ran off my last batch of maker's plates, so I'll either have a very busy Autumn, or will have to arrange an alternative...

