What happened at your workbench today?

Erm ................. Mk 2. Mk1 had issues with the holes, for some reason some of the aluminium was in the wrong place, and they didn't line up :emo: :emo: :emo:

This could be better - you have to remember that I am not an engineer; I am a devout bodger :nod::nod:

View attachment 333986
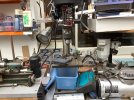
Things like this where a good vertical drill is a must if you do not have one. Was one of my must haves for many years till I got one in 1993 or so. Would never be without one now. LGB point motor for scale. I am tempted to move the Mill on as I very rarely use it to be replaced by a small 3d printer.
image.jpg
 
Things like this where a good vertical drill is a must if you do not have one. Was one of my must haves for many years till I got one in 1993 or so. Would never be without one now. LGB point motor for scale. I am tempted to move the Mill on as I very rarely use it to be replaced by a small 3d printer.
View attachment 333987
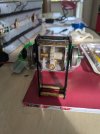
Yep, I did use my vertical drill holder on the Mk2 - even so, things didn't start off too auspiciously, but a quick visit to Rhino's bodgemproium managed a cure :whew::whew:
 
Things like this where a good vertical drill is a must if you do not have one. Was one of my must haves for many years till I got one in 1993 or so. Would never be without one now. LGB point motor for scale. I am tempted to move the Mill on as I very rarely use it to be replaced by a small 3d printer.
View attachment 333987
Boy, with some more useful stuff laying around on your bench, it could nearly be as tidy as mine, nearly being the operative word. I just don't have the time to pack up only to get it all out again
maybe one day when I'm not driven to build stuff. Dunny is that classed as a micro drill press ? .
 
Boy, with some more useful stuff laying around on your bench, it could nearly be as tidy as mine, nearly being the operative word. I just don't have the time to pack up only to get it all out again
maybe one day when I'm not driven to build stuff. Dunny is that classed as a micro drill press ? .
Not bought as such but I guess you could call it that. But it is quite a beast and has a good sized chuck ( don't ask how big). Will drill through quite big stuff with ease having setup to allow differing speeds by moving the belt on the top.
 
Not bought as such but I guess you could call it that. But it is quite a beast and has a good sized chuck ( don't ask how big).
How much wood can a woodchuck chuck if a woodchuck could chuck wood .........................?

Back to the Mk2 gearbox.

It seems that while the motor mounting holes are all in the right place relative to each other and in a straight line, they have all drifted north a tad. I'll get the axle fitted and see if I can shim the motor one side to alter the angle of dangle :p:p

In order to fit the axle, I'll need to pop it all in the chassis as the wheels are force fitted on the axles and don't like coming off too frequently - I already have to deal with one loose one.
 
Not bought as such but I guess you could call it that. But it is quite a beast and has a good sized chuck ( don't ask how big). Will drill through quite big stuff with ease having setup to allow differing speeds by moving the belt on the top.
I'm sure it's a beast with a 13mm capacity, mines a bit larger, not much, have had it since 1984, don't recall having to change the V belt and I never change the speed.
 
I owe my soul to the company store - which was made illegal in this country in the mid-19th century by the Truck Acts
1831 and in 1965 when I started my first job after graduating working for J. Lyons & Co. at Cadby Hall, I was offered an interest free loan to tide me over before my first pay day and had to sign a form under the Truck Acts allowing Lyons to deduct the loan from my monthly salary for six months.
 
1831 and in 1965 when I started my first job after graduating working for J. Lyons & Co. at Cadby Hall, I was offered an interest free loan to tide me over before my first pay day and had to sign a form under the Truck Acts allowing Lyons to deduct the loan from my monthly salary for six months.
and the practice of paying in tokens redeemable at the company store was allegedly alive and well in the Falklands up to about 1982 :think::think:
 
OK, I think it's called progress.

Having, after many unsuccessful attempts, now mounted the motor/gearbox the right way round and the right way up in the chassis block, the next challenge which I wasn't looking forward to, was to fix it - so that the motor actually turned the axle rather than rotating around a stationary axle :rolleyes::rolleyes:

As luck would have it, when the motor was in the upright position, there was a thin gap between the edge of the gearbox and the two chassis spacers, and I had an offcut of aluminium that was ferzackerly the right thickness :angel:

A bit of two-part epoxy and the job'll be a goodun. Then all I have to do, apart from installing the other axle and the external chain drive, is to manufacture a bogie mount :worried::worried:

If it all works, it will have cost me nothing, but I will then have to buy a new battery pack :nod:

PXL_20241021_120830825.jpg
 
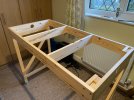
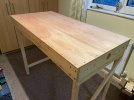
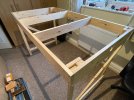
Not so much working on the bench, as working in the work room. I have at last got around to making a start on assembling the base boards for the Claptowte Railway. The first pic shows the frame of the first of a pair 1200 x 600 mm boards that will form the base, joining the two legs of the 'U' shaped layout, with one of the legs being the terminus, Gernise End, and the other, the storage sidings Phydell Yard. These boards, as well as accommodating the curve that will join the two legs, will also carry the sidings known as Goudes Sidings. These boards will be numbered 5 & 6.

The bare frame

dig 241028001.JPG

The frame topped with 9mm plywood.

dig 241028003.JPG

The boards will not be finished until I have filled the screw holes, sanded everything flush, added locating dowels and catches, oh and did I mention paint

The next pic shows the frame of the first of four 1500 x 825 mm boards. This board, to be number 7, will form the bottom right leg of the 'U' and will carry the the curve up to the throat of Phidell Yard at the start of board 8, also the ends of the sidings at Goudes Sidings, and, the ends of the loco stabling facilities at Phidell Yard.

dig 241030001.JPG

Lots of work still to do, it's only taken me getting on for 30 years of modelling to get to this stage.

David
 
Not so much working on the bench, as working in the work room. I have at last got around to making a start on assembling the base boards for the Claptowte Railway. The first pic shows the frame of the first of a pair 1200 x 600 mm boards that will form the base, joining the two legs of the 'U' shaped layout, with one of the legs being the terminus, Gernise End, and the other, the storage sidings Phydell Yard. These boards, as well as accommodating the curve that will join the two legs, will also carry the sidings known as Goudes Sidings. These boards will be numbered 5 & 6.

The bare frame

View attachment 334435

The frame topped with 9mm plywood.

View attachment 334436

The boards will not be finished until I have filled the screw holes, sanded everything flush, added locating dowels and catches, oh and did I mention paint

The next pic shows the frame of the first of four 1500 x 825 mm boards. This board, to be number 7, will form the bottom right leg of the 'U' and will carry the the curve up to the throat of Phidell Yard at the start of board 8, also the ends of the sidings at Goudes Sidings, and, the ends of the loco stabling facilities at Phidell Yard.

View attachment 334437

Lots of work still to do, it's only taken me getting on for 30 years of modelling to get to this stage.

David
Nice solid looking construction David. A guy in our club has his outdoor layout on about 8 plastic folding tables and it works well.
 
Nice construction David1226 David1226 but you will regret the weight as the years go by. Ply around 1x6cm would be equally as strong but much lighter with holes in cross and diagonal cross bracing to help reduce weight. Though I understand you method of fitting legs could be debatable with a ply sub base.
 
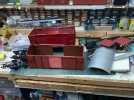
2 of my 3 finger slips now have a plan. The next one which is a NQ van that has been bogied up will be initiated to the DR Gartenbahn fleet. As such it needs a spray to my standard van colour of Halfords undercoat red my chosen brown. The other one going to G3 is going to Halfords BMW Imolla Red, sadly a colour that appears to have been replaced so I just had enough. Both vans had the black ironwork handrails etc removed for spraying, with a nice sunny day the opportunity to spray up was taken. Both vans on the bench to overnight finish hardening off before ironwork returned and lettering created.
IMG_8251.jpeg
 
Back
Top